Thursday 13 December 2012

LG Optimus 2X (pre-gingerbread)

Before you do anything — Make a backup

Don't forget to back up your data. If you have synced the device with a Google account, then the contacts, calendar, Gmail, & select other Google-related data will not be lost and will come back after the next sync. However, you should backup anything you want to keep that is not stored on the SD card:
It would also be a good idea to backup everything stored on the SD card in the rare case the SD card must be formatted to resolve any major problems.
MyBackup Root, SMS Backup & Restore, and Call Backup & Restore are all free applications that can assist with backing up your data.

Rooting the LG Optimus 2X (pre-gingerbread)

Warning: Rooting the LG Optimus 2X will void the warranty.
  1. This guide works only on phones NOT updated to LG provided Android 2.3 (gingerbread)
  2. You will need ADB on the computer to root the LG Optimus 2X. Follow the Android SDK guide, to get the ADB shell on the computer.
  3. Download busybox, psneuter, Superuser package & the LG Drivers:
  4. Install the LG device drivers (windows only).
  5. Unzip psneuter, busybox & the Superuser package and copy the contents to the same folder as adb (the /platform-tools folder within the Android SDK folder).
  6. Connect the LG Optimus 2X to the computer via USB.
  7. On the computer, open terminal and run the following commands:
    adb push busybox /data/local/
    adb push psneuter /data/local/
    adb push su /data/local/
    adb shell chmod 777 /data/local/busybox
    adb shell chmod 777 /data/local/psneuter
    adb shell
    /data/local/psneuter
    adb shell
    mount -o remount,rw -t ext3 /dev/block/mmcblk0p25 /system
    mkdir /system/xbin
    /data/local/busybox cp /data/local/su /system/xbin/su
    chown 0:0 /system/xbin/su
    chmod 6755 /system/xbin/su
    ln -s /system/xbin/su /system/bin/su
    exit
    adb push Superuser.apk /system/app/Superuser.apk
  8. Reboot the LG Optimus 2X and it is now fully rooted..

Tuesday 23 October 2012

Samsung Galaxy Note (N7000)

ROOT SAMSUNG GALAXY NOTE (N7000)

  • Download the required files from the link provided.
  • Go to DOWNLOAD mode of your phone by pressing (switch off+volume down+home) buttons.
  • Connect your device using usb (obviously).
  • Extract the folders on desktop screen.
  • Extract and Run ODIN 3.07.exe.
  • Select PDA option in ODIN and select tar file provided.
  • Then Start the program and be calm and cool.
  • After rebooting you wud see SUPERUSER.apk & CWM.apk.
  • Enjoy each and  every part of your device..

                                                                  DOWNLOAD LINK

Wednesday 3 October 2012

Samsung Galaxy S2 i9100G

How to ROOT Galaxy S2 i9100G via Zip

  1. Download : Root-S2-i9100G.zip
  2. Place it on the root of SD card.
  3. Then goto Recovery mode by holding <Home+Power+Vol Up>
  4. Select the Zip.
  5. Install it.
  6. Reboot

ClockWorkMod for Galaxy S2 i9100G
  1. Download : CWM S2 i9100G
  2. Place it on the root of SD card.
  3. Then goto Recovery mode by holding <Home+Power+Vol Up>
  4. Select the Zip.
  5. Install it
  6. Now you will see the CWM recovery instead of Default Samsung Recovery mode
THANKS TO DEVELOPER!!

Tuesday 2 October 2012

Motorola Defy

Warning: Rooting the Motorola Defy will void the warranty.
  1. You will need ADB on the computer to root the Motorola Defy. Follow the Android SDK guide, to get the ADB shell on the computer.
  2. Download rageagainstthecage-arm5, the Motorola Drivers & the Superuser package: 
                          Download Link Motorola Defy
  1. Windows Only: Install the Motorola device drivers.
  2. Unzip rageagainstinthecage-arm5 & the Superuser package to the same folder as adb (the /platform-tools folder within the Android SDK folder).
  3. Connect the Motorola Defy to the computer via USB.
  4. On the computer, open terminal and run the following commands:
    adb push rageagainstthecage-arm5.bin /data/local/tmp/
    adb shell
    chmod 755 /data/local/tmp/rageagainstthecage-arm5.bin
    /data/local/tmp/rageagainstthecage-arm5.bin
  5. Once the exploit finishes, in terminal, run the following commands:
    exit
    adb kill-server
    adb start-server
    adb shell
    NOTE: You should see a "#". If you see a "$", then the exploit didn't work, please repeat steps 6.
    mount -o rw,remount /dev/block/mmcblk1p21 /system
    exit
    adb push su /system/xbin/
    adb shell chmod 4755 /system/xbin/su
    adb push Superuser.apk /system/app/
  6. The Motorola Defy is now rooted, please continue to the next section.
NOTE: If rooting did not work with rageagainstinthecage-arm5 (like on my Defy with Android 2.2.2), you can also try the psneuter package.

Installing bootmenu & the ClockworkMod Recovery

If the Motorola Defy already has bootmenu & the ClockworkMod Recovery installed, you may skip this section.
  1. You will need ADB on the computer to install bootmenu the Motorola Defy. Follow the Android SDK guide, to get the ADB shell on the computer.
  2. Download the latest version of bootmenu (includes the latest version of the ClockworkMod Recovery):
  3. Unzip the bootmenu package into a folder called bootmenu & copy this folder to the root of the SD card.
  4. Connect the Motorola Defy to the computer via USB; make sure that USB connection is set to None.
  5. On the computer, open terminal and run the following commands:
    adb shell
    su
    cp -R /sdcard/bootmenu /data/bootmenu
    cd /data/bootmenu
    chmod 755 *
    ./install.sh
    rm -R /data/bootmenu
  6. Bootmenu is now installed on the Motorola Defy. See Motorola Defy: bootmenu, on more info on booting into & using bootmenu. 
WARNING-NO ONE IS RESPONSIBLE IF PHONE BRICKS!!

Micromax A50

<--Rooting Micromax A50-->
|||||||||||||||||||||||||||||||||||||||||||||||||| |||||||||||||||||||||||||||||||||||||||||||


This tutorial will tell you how to root your Micromax A50.

So lets get started!
[/]Make sure you are not low on battery.
[/]Make sure your device is completely switched off.
[/]Take off your battery and put it back on,BUT DO NOT TURN ON THE DEVICE.


FIRST STEP :
Download the files
Here's the link for the full Root package for Micromax A50 :-
--------------------
Download Link a50_root
--------------------
__________________________________________________ ________________________________________

STEP 2 :
Setting Up Things
Extract all the files from the rar package above.After extracting it should look like this :


Now extract files from "mt65x3-usb-vcom-drivers.rar" and open InstallDriver.exe,It will install the drivers needed for the Flashing Process.(Open installdrv64.exe if you have a 64-bit system)

Now open "SP Flash Tool v2.1134.00.7z" and extract the contents to a new folder.
This is the software that you will use for the flashing process.

Now you need to install UnLock Root.This is the software that will root your Device.Open "unlockroot23.exe" and install it.

MT6573_Android_scatter is needed for starting the flashing process.

usb_driver.zip will stay there for now,But you will need it later.This zip file contains the ADB Drivers that is required for the rooting process.

orginal a50 boot.img folder contains the stock boot.img file of A50.So if anything goes wrong and your phone is not booting up,You can flash this file,and it'll be back to normal.

__________________________________________________ ________________________________________

STEP 3:
Flashing Insecure boot.img
After you've done setting up things,it's time for flashing!
Open SP Flash Tool (Flash_tool.exe),
And Select File>Open Scatter loading file and select MT6573_Android_scatter.txt.And Uncheck everything on the list for now.


Ignore any errors that will pop up like these :


Single click on BOOTIMG and select the boot.img provided in the package.


Take out the battery, put it back and without turning on the device Connect it to your PC with the USB cable without pressing any button on the phone. Now windows should find the drivers and install it. After drivers are installed, unplug the cable from your phone. Take out the battery from the phone and put it back again. Do not switch on.

After you've done that,Hit F9 or Click on the "Download" button.


Then under
15 seconds,connect your device to the PC.You will see a yellow progress bar,When it reaches 100% a pop up window will appear saying BOOTIMG downloaded.
Now that you've successfully flashed the boot.img,Unplug your phone, take the battery out, put it back and start the phone normally as you do. Let it fully boot.

__________________________________________________ ________________________________________

STEP 4:
Rooting Process

Now your device is ready to root! In your device Do the following
Go to settings->Applications->Check unknown sources.
Go to settings->Applications->Development->Check USB Debugging.


Now you need to install ADB Drivers,First Extract 'usb_driver.zip'.To install ADB Drivers,Plug in your device to your PC,without turning it off,And do not mount SD Card.When you plug in,Windows will try to find drivers for "MICROMAX A50" and will simply fail.Don't Freak Out,Now go to Device Manager From Start Menu,Right click on 'Micromax A50' and click 'Update Driver Software'.On the new window, click 'Browse my computer for driver software', then click 'Let me pick from a list of device drivers on my computer'.Click 'Have Disk'. On the new Pop-up window, click 'Browse'And select 'android_winusb.inf' from the folder you extracted from 'usb_driver.zip'.Now,From the list,Select Android ADB Interface and click next,A Warning will pop up saying "Would you like to install this device driver software. Click Install.And the drivers will be installed.Thanks to kankfraud for providing drivers.

Open unlock root on your PC and click on ROOT!The program will root your device.When finished,it will ask you to restart your phone. So switch it off and switch it on again.

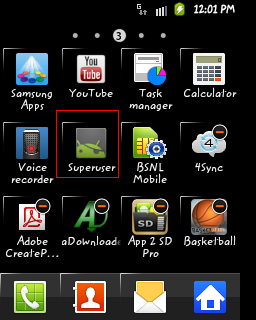
Now go through your Appdrawer,You should find an application called Superuser.If you do,Then your device has been rooted!

I'm not responsible if something happens to your device.

THANKS TO DEVELOPERS!!

Samsung Galaxy Mini

This information is to make my frnds know how to root ur galaxy mini 2.3.x gingerbread. Follow the steps to master your phone and access each and every single corner..
  • Download the either of the file from the links.
  • Copy the files to the root of your sdcard not in any folder.
  • Reboot ur phone in clockwork recovery mode by long pressing home key+switch key.
  • Navigate using up and down arrow key towards zip file and press home button to install.
  • Reboot ur phone and u will see an app "superuser". This will grant permission to use ur apps.

  •  

Samsung Galaxy Y

Feature Of Multi Root Installer

Added SuperUser 3.1.3+Su
Added SuperSU 0.94+Su
Added BusyBox binary v1.20.2
Added SQlite3
Added SSh

UnRoot Support

Deleting all traces of Superuser And SuperSU
Deleting all traces of Suhax
Deleting all traces of Busybox and Busyboxpro

Supported/Tested Device
(If It Work On Other Device Please PM Me i wl Add It In List)

Galaxy Y (GT-S5360)
Galaxy Y Duos (GT-S6102)
Galaxy ACE Duos (GT-S6802)


THANKS TO DEVELOPER!!

                                            Download Link Multi Root Installer
                                                 Download Link CWMGalaxyY